Copyright 2005 by Junior Doughty
Click thumbnails for full size photos
.
|
A few weeks before hunting season 2005, a sad realization came to me: my aging eyes couldn't see the sights of my Ruger Super BlackHawk pistol well enough to hunt with it. At 25 yards I could see the sights ok, barely ok, but at 50 yards the sights became one large blur. Even the white insert in the front sight didn't help. Looked like I either had to give up hunting with my SBH or install a pistol scope on it. Horrors! Then a poster on the Cast Boolits forum suggested I try a One Ragged Hole rear sight. So I visited the web site at www.oneraggedhole.com (dead link 8-01-11) and ordered one. It cost $24.95 shipping included. I ordered it via the Internet on a Tuesday morning, and the following Friday morning my snailmail lady delivered it. That's fast service.
It made a big difference! My 62-year-old eyes could easily distinguish the rear sight from the front sight. The only problem was finding the front sight in dim light. Aiming at a dark tree trunk in shaded woods, for example, I could see the white insert in the front sight, but the black upper part totally disappeared when aligned with a dark object. I needed a fiber optic front sight. While I was at it, I also needed a higher front sight for shooting heavy cast bullets like the Lee C430-310-RF. With the rear sight all the way down against the frame, heavyweight bullets still shot high. Many hours spent searching the Brownells catalog and the Internet produced nothing. It looked like a higher front sight meant sending the pistol back to Ruger or to a gunsmith. But a new front sight would not be a fiber optic sight. So I decided to modify the old front sight. I would build it higher using J & B Weld and then epoxy a fiber optic rod on top. I had J & B Weld and epoxy on hand, and a visit to the Brownells web site soon produced a tube of three, .060" x 6" fiber optic rods, one red, one yellow, and one green.
If you don't want to buy a $23 package of fiber optic rods from Brownells, I'll sell you a 9" rod for $2, which is enough for many sights. Click here. I began by thoroughly cleaning the pistol's front sight with rubbing alcohol. I then used a wire brush and removed the bluing from the top of the front sight, all the way down to bare metal.
As this photo of the sight's left side shows, I spread the J & B Weld in a very thin layer down both sides and the front of the sight. I also let it ooze back and over the white plastic insert. All that gave the J & B Weld extra surface with which to bond and, therefore and hopefully, increase the chance of a permanent juncture.
This look at the front of the sight shows the J & B Weld smeared down the edge.
I used a small triangular file to remove high spots on the sides and to flatten the top. If the reader desires simply a higher front sight without a fiber optic rod, then stop here and add paint. This photo clearly shows the very thin layer of J & B Weld on the side of the sight at its top. Actually, the thickness of the front sight blade measured exactly .125" before the J & B Weld and .130" afterwards. So the layers of J & B Weld on the sides of the sight are ~.0025" thick. That's what you call just barely.
Here's a view looking down at the top of the flattened sight.
The observant reader will notice black paint on the front of the J & B Weld addition. It's there because I originally intended only to raise the height of the sight. The addition of a fiber optic rod came as an after thought. One I'm glad I had, by the way, as the finished sight with the fiber optic rod is great.
To attach the 1/4" section, I put a thin layer of epoxy on the top of the sight and in the groove shown above. Then I dropped the tiny rod in place. That was all I did. I expected a gap at the sides of the rod and was prepared with a toothpick to spread the epoxy upward. But it oozed upward against the rod on its own. After bunches and bunches of medium-kicking rounds and 50 or so high-kicking rounds, the sight still looks just like you see it here. I suspect it will remain that way.
Here we see both sights ready for action on my 25 yard range just past the woodpiles.
The addition of these sights has greatly increased my confidence in my ability to cleanly kill deer and hogs with this 44 mag pistol to 50 yards max. Yes, it would cleanly kill at 100 yards, but if I can't put 20 of 20 rounds in a 10" plate at the shooting distance I won't take the shot.
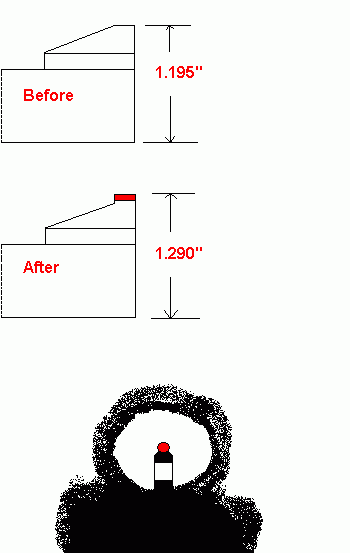
This graphic shows the height gained, exactly .095" or plenty of elevation adjustment for big cast bullets.
An increase in front sight height of ~.010" lowers the POI ~ 1" at 25 yards. In other words, I lowered the POI ~10" at 25 yards.
Here we see the approximate view of my SBH's sights as seen by my 62-year-old eyes without reading glasses. In other words, this is what I would see while hunting. Actually, the front sights are just a little more blurred than shown in this graphic. The target, however, is clear as a bell to my naked eyes.
|
)
)
)
)
)
)
)
)