|
I had a little kitchen paring knife that I liked. Its 3" x 5/8" drop-point blade was perfect for kitchen work, and the small-diameter handle was easy to hold. But the handle was way too short for my hand, and I did not like the width of the blade because it left room for only a tiny guard due to the 1/2" haft. I had to be careful using the little knife or I'd cut my index finger. After I read a Buckskinner forum about making knives from saw blades, I'd look at the little paring knife and mentally redesign it, especially since it seemed about the same thickness as a circle saw blade. My mental design had a blade like the paring knife but wider, allowing a bigger guard. The handle was much longer than the handle on the paring knife. Around the time I was thinking about knife making, I noticed that the wooden handle on the paring knife was split, stayed damp, and probably made a wonderful home for all kinds of bacteria. I decided to replace the handle and maybe learn something in the process. To anyone thinking of making a knife, I recommend that they do as I did and gain experience by replacing the handle on a simple kitchen knife. It's the most difficult part of making a knife. My paring knife handle was a simple piece of hardwood with a saw-cut down the middle in which the haft fit. Two cutler rivets firmly attached it to the haft via two counter-sunk holes drilled through the handle and the haft. For hardwood, I could use a piece of one of the heart cedar limbs I keep in a corner of the yard. All I needed were cutler rivets. But they were hard to find. I finally ordered a package online from Texas Knifemaker's Supply. Since I wouldn't spend the plastic for a counter-sink drill, I repaired the knife with non-counter-sunk cutler rivets. It looked and worked just fine. In fact, the exposed rivet heads made it easier to hold. Here's what I learned after making that paring knife handle, all of which came in handy when I made the handle for my super-cool Junior-made squirrel skinnin', tater cuttin' sheath knife:
In other words, the next knife handle I made would fit my hand perfectly.
I decided to make my super-cool Junior-made knife and sheath using tools and material available to anyone. A person living in an apartment could make the knife and the sheath in that apartment using tools and material on hand or easily borrowed or scrounged. Everything should be readily and locally available—free or cheap.
Material:
Tools & equipment:
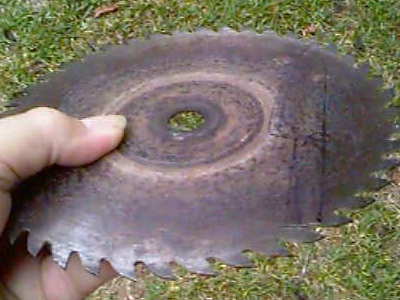
There's a story behind that saw blade. We recently repaired the roof on our fishing camp, and we were forced to use that hopelessly dull saw blade because the nearest hardware store—20 miles away—was closed. So that saw blade received some cussings that would curl the ears of a sailor.
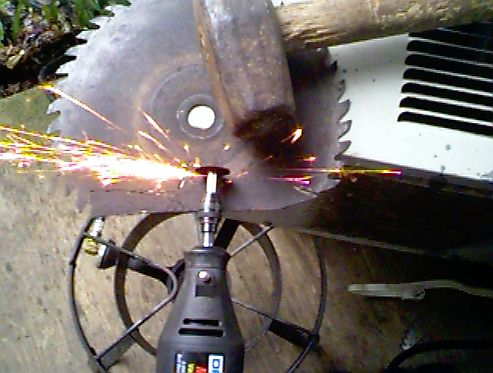
That cheap cutting wheel worked like a charm on the hardened steel saw blade. It took me no more than 15 minutes to cut the knife blade from the saw blade. And I used only one cutting wheel. The circular black metal thing below the Dremel® tool is the burner for my propane fired fish cooker. I should have moved it for the photo, but I didn't. Notice my fancy work bench. It's a dead air conditioner sitting on a metal garbage can while it awaits a ride to the dump. Notice my fancy vise. It's a sledge hammer. If you'll remember, I said a guy living in an apartment could make this knife.
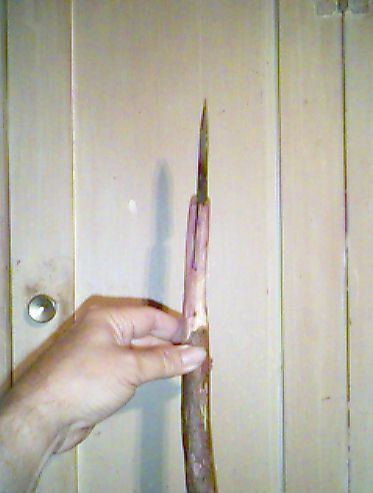
That roughed-out blade looks like a piece of junk, but hang on and see what happened to it after I installed a grinding wheel in the Dremel® tool. I held the roughed-out blade in pliers and let the tool do its thing.
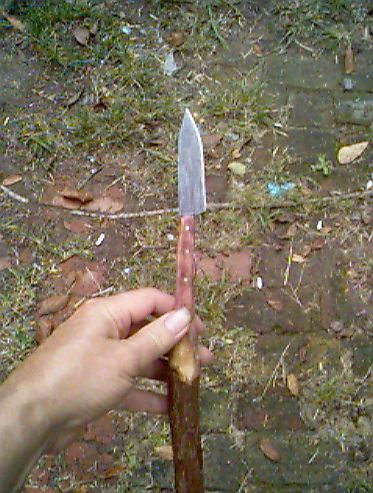
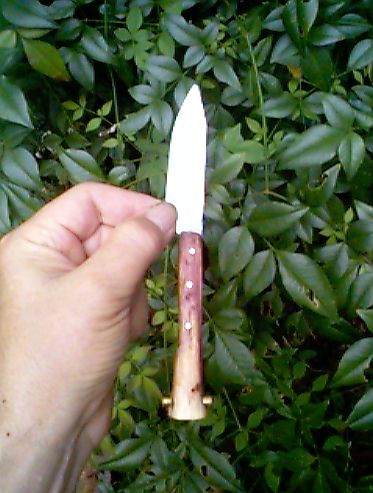
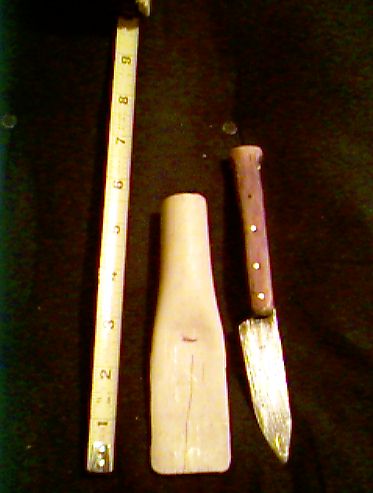
The blade/haft measures exactly 5" in length. That's 3" for the blade and 2" for the haft. At its widest point, across the guard, it measures 13/16". About 1/8" past the guard it narrows slightly to a width of 3/4" and remains that width until it starts the curve toward the point. I've included those exact measurements for reference but none of them are important. The edge of the blade from about the top of my thumb to the guard was left un-sharpened, dull, in order to give a margin of safety for my index finger. That's important. Notice that the haft contains slots instead of holes. I tried to drill holes. I ruined two expensive 3/32" high speed drill bits. I tried to grind holes and ruined an expensive tungsten-carbide engraving tool. No need to worry about whether or not that blade would hold an edge! I finally reinstalled the almost worn out cutting wheel in the Dremel® tool and cut holes for the pins—well, slots for the pins. I figured, correctly, as it turned out, that slots instead of holes would make seating the brass pins easier, and that epoxy would fill the gaps between the pins and the edges of the slots. Besides, I wasn't about to hire a gunsmith or a machinist to drill holes in my Junior-made knife blade. It wouldn't be Junior-made if I did that. Now that the blade was finished except for final sharpening and polishing, the time came to mate metal to wood.
This photo shows the edge side of the blade and the bottom of the handle, which is still part of the cedar limb and which has been carved with a Dremel® tool sandpaper wheel. On wood, a sandpaper wheel works better than a grinding wheel. The knife blade is a just-snug fit in the saw cut. A snug fit is too tight, and so of course is a tight fit. Either will eventually cause the handle to split. So err on the side of slightly loose. Epoxy will fill the gap. If your fit is too tight, use a hacksaw blade and ream the sides of the cut.
I began installing the haft pins by cutting three 1"or so pieces from the brazing rod. I then slightly pointed one end of each piece/pin to ease their passage through handle and haft. I then used the cutting wheel again and reamed each slot in the haft so the pins were sloppy fits. Epoxy, remember? Carefully placing the haft atop the handle above its future permanent position, I used a small felt tip marker and marked each slot's location on the handle. I then installed a 3/32" drill in the Dremel® tool and drilled a hole through the handle at each mark, trying my best to keep the tool perpendicular to the handle. I was either in luck or good at eyeballing perpendicular drill paths. Pointing the pins and making them a sloppy fit through the haft were good ideas. With firm finger pressure, each pin went completely through the knife handle. I removed them and reamed the holes slightly, making each pin a slightly loose fit so as not to stress the handle. Epoxy would fill the gaps. It was time to glue everything together.
The photo on the right shows the knife the next day after the Dremel® tool grinding wheel did its thing to the protruding pins. One more step, and we can cut the knife from the cedar limb. It was time to drill the lanyard hole and install a liner.
The lanyard hole took a while to drill because of the danger of splitting the edges of the hole. Using a hand-held 1/4" electric drill, I drilled it first with a 1/8" bit. I followed that bit with an 11/64", then a 3/16", then a 13/64", then a 7/32", and then finally with a 15/64" bit. After a little reaming, the .22 magnum hull was a slightly loose fit. I then epoxied it in the hole and let it dry. A few minutes work with the Dremel® tool grinding wheel on the protruding ends of the .22 magnum hull and another few minutes work with sandpaper, and I held in my hand the world's only Junior-made knife.
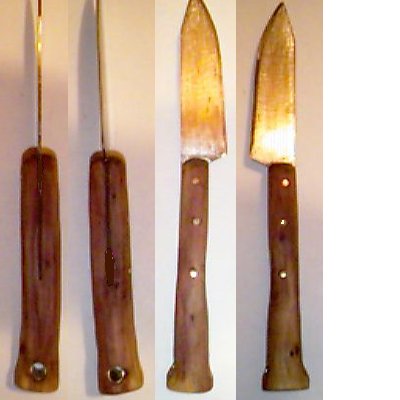
The top and bottom images show the hand-fitting natural curve of the original cedar limb. The right and left side images show the hand-filling swell of a Paterson Colt pistol butt. All the images show, IMHO, one super-cool Junior-made squirrel skinnin', tater cuttin' sheath knife. But what good is a super-cool knife without a sheath?
Material:
Tools & equipment:
If you've read this far, you're probably curious as to just how in hell you can make a knife sheath out of PVC water pipe. Well, the answer is, You don't. The PVC pipe is a liner for the sheath. It prevents the blade edge from contacting leather and thereby cutting it, and, properly modified, it serves as a duckbill-like spring to keep the knife in the sheath. I designed my sheath so that I could wear it horizontally. I could wear it upside down if I wanted—without tying the knife to the sheath. I ruined three pieces of PVC pipe before I made one that worked. It also took me about two hours to do that. If you pay attention—and learn from my mistakes—you should make one on your first try and take only fifteen minutes to do it. First, see what size PVC pipe you need by seeing if your knife fits inside it. I used 1". If your knife is bigger, you may need 1 1/4" or 1 1/2" pipe. Cut your PVC pipe section about 1" to 2" longer than you think you need. You can remove material from the ends but you sure can't add material. The objective is to boil the PVC pipe until it becomes soft, pliable. That's why we're using cold water PVC instead of hot water PVC. After just a few seconds in boiling water, cold water PVC pipe becomes pliable. When our section of cold water PVC becomes pliable, we flatten one end. Simple. No? Keep reading and study the photos below. Mark your PVC pipe section so that the flattened part will be about 1/2" longer than your knife blade. Boil a large pot of water. Drop your section of pipe in the boiling water. After about twenty seconds, remove it with pliers and quickly press it between two flat boards at the mark. I placed my hot section between two boards and stood on the top board. This step would go faster and easier if someone helped you. When the section cools a little, make sure the two flat halves touch or almost touch each other at both ends of the flattened section. If they don't, just drop the PVC section back in the boiling water and it quickly resumes its original shape. Then try again. Also, make sure the section isn't bent at an angle. If the two halves do touch or almost touch, it's time to make them think they're a duckbill-like spring. You do that by using the Dremel® tool cutoff wheel and slicing the two sharp edges, separating them.
I trimmed the big end enough so that some leather could overlap it and hide the white PVC pipe. I then trimmed the flattened end just enough so that the blade point didn't protrude. NOTE: Trim the big end first. The shorter the big end gets, the more back and forth movement the blade gets. If I insert the knife fully into the PVC section and wiggle it up and down, the blade does not protrude past the flattened PVC edges where it might possibly cut the leather, which I later attached to the PVC section. As you can see, especially in the full size photo, I rounded the sharp corners.
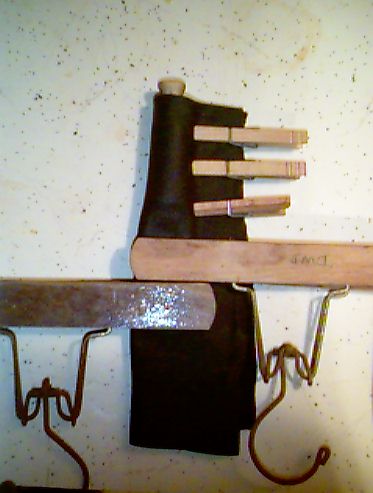
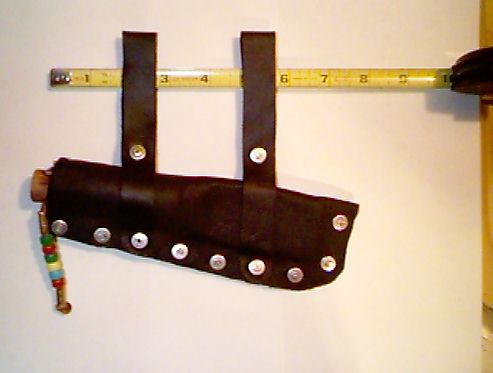
The PVC section starts 1" below the top of the leather, at about the position of the top clothes pin. I wanted the PVC section far enough below the top of the leather to prevent anyone from seeing it. After all, it's white. I simply smeared a little epoxy on the PVC section, staying away from the cut edges, and wrapped the leather around the section. The clothes pins and pants hangers held it all in place while the epoxy dried.
I aligned pop rivet washers on the leather in order to (1) symmetrically space the rivets and (2) decide which rivets would hold the belt straps. Spacing ok and decision made, #3 and #6, I then marked the center of each washer. I then drove a 10 penny nail through each mark. I then installed a pop rivet with a washer on each side in every nail hole but #3 and #6.
The sheath almost finished, I flattened the protruding side of each pop rivet by placing the smooth side on a hammer head and tapping the other, protruding side with another hammer. I then trimmed the excess leather with scissors. I put colorful beads coded with my initials—JLD—on a short leather thong and installed the thong through the lanyard hole. If I drop the knife in leaves, the colorful beads help me find it. I soon held in my hands the world's only Junior-made knife and sheath. It was very cool, and I was a very proud fellow. I put it on my belt. Something was wrong. The handle hung down, not at a slight upward angle. What tha hell? I removed the sheath from my belt. Everything looked ok. I put it back on my belt. The damned thing still hung down! Then realization struck me. It wasn't the sheath; it was my belt. In the last couple of years I've developed a little round belly. As the belly developed, my belt in front moved downward in a less than horizontal position. So with a sigh of sorrow for the loss of the flat-bellied days of my youth, I put a pop rivet 1" down from the top of the front strap. Now the loop won't take a 2" belt, but the sheath hangs horizontally. The horizontal position of the sheath works great. It doesn't get in the way when I sit in a chair, and in the car it doesn't interfere with buckling the seat belt. In the woods, the handle of the knife is easy to find just to the side of my coat opening. No having to reach back and unbuckle a sheath and then fumble with a knife. Just stick my hand through my coat opening at the bottom, grasp the knife's handle between thumb and index finger, then give it a quick tug. Out it pops. Try it. You'll like it.
|