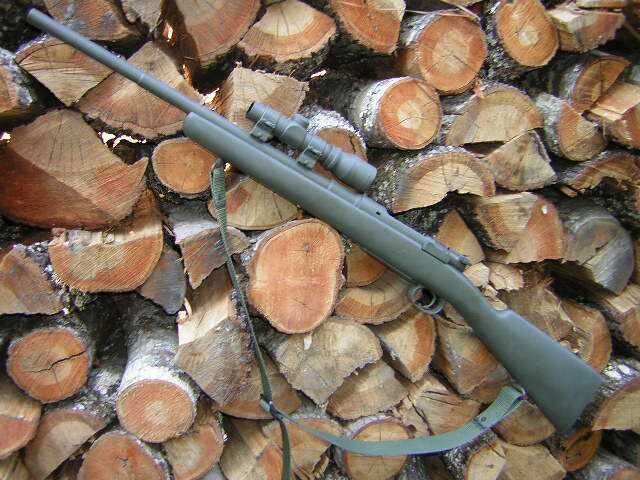
 Check out my Model 1893 7x57 Spanish Mauser in a picture taken in 2005. The rifle was born in 1924, so it was 81 years old when I took this photo. Check out my Model 1893 7x57 Spanish Mauser in a picture taken in 2005. The rifle was born in 1924, so it was 81 years old when I took this photo.As explained in a previous article about this rifle, I hacksawed off the rusted end of the barrel, and the rifle suddenly became a MOA or better shooter. With the sudden accuracy and the rifle's light weight and low recoil, I had myself a dandy deer rifle. For deer season 2009-2010 I decided to get rid of the old 2x pistol scope shown here and replace it with a modern scope with better optics. The scope shown here was almost useless in early mornings and late afternoons. My new scope choices boiled down to either Leupold or Burris, both made in the USA and both with great optics.
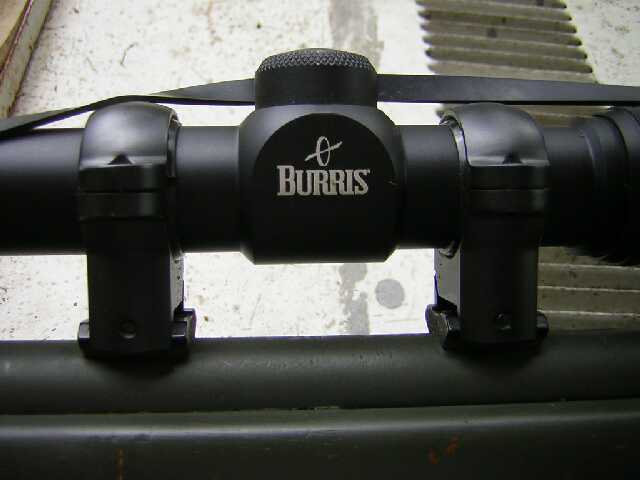
Basically, the eccentric inserts allow boresight-adjusting the scope not with the scope's adjustment knobs but by rotating the eccentric inserts between the rings. At zero time on the shooting range, the scope was only a couple of inches off, not a couple of feet. Burris has a winner in these rings and eccentric inserts!
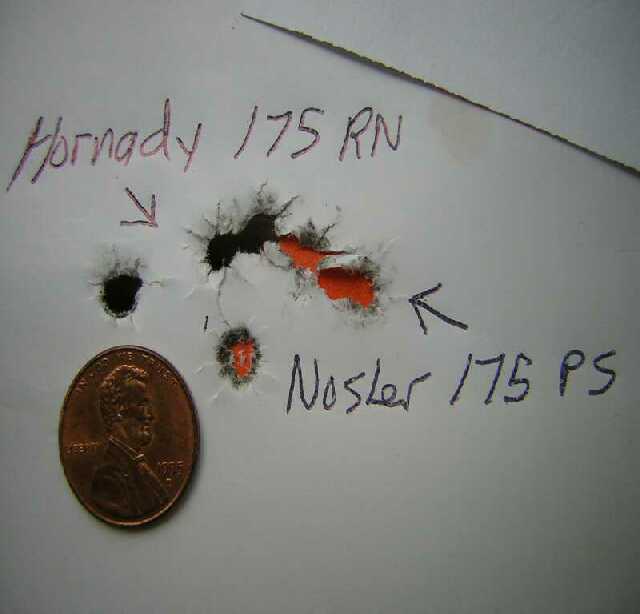
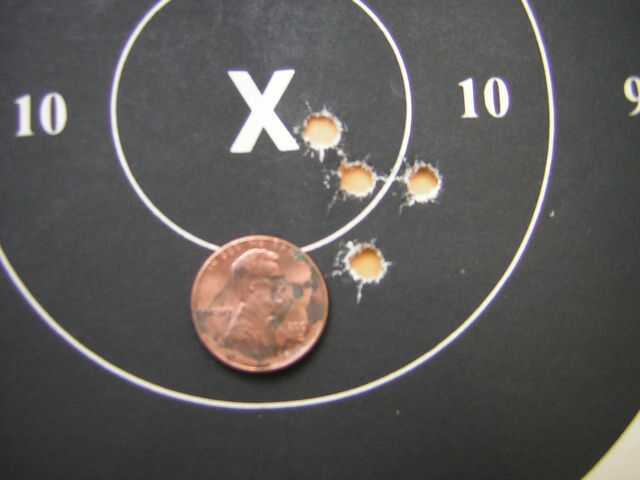
Here we see two groups with two different bullets, both @ circa 2,000 fps and with the same scope zero. Yes, I know I could push both bullets to 2,300 fps, but the rifle is old. Besides, I ground hunt and don't want to kill someone 500 yards off through the bushes.
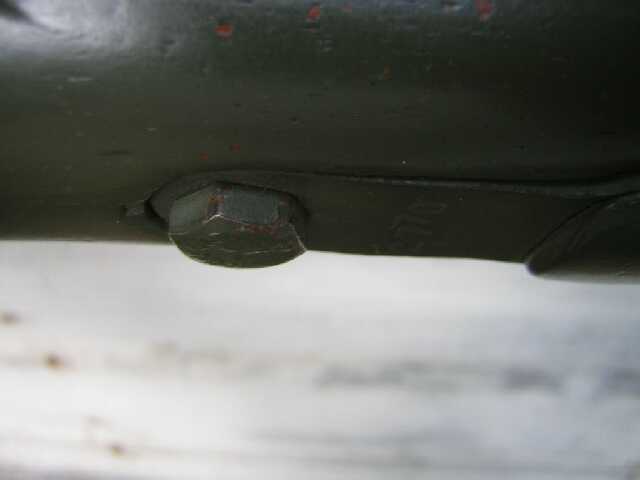
The front action screw was the cross threaded 1/4" x 20 NC bolt you see here. I assumed a previous owner had lost the original Mauser screw and replaced it with whatever was handy. I also assumed someone had over-tightened the 1/4" bolt and bent the front of the trigger guard assembly. I'd taken the screw out perhaps twice in the nearly 40 years I'd owned the rifle. As I had a copy of Kuhnhausen's Mauser Shop Manual I knew the fix if the threads stripped completely—drill out the stripped threads in the recoil lug, solder in a plug, then drill & tap the plug for the proper Mauser front action screw. As that was beyond my capabilities, I estimated the gunsmith cost at around $100. Not on a $30 rifle. So I kept the rifle dry and the cross threaded bolt in place.
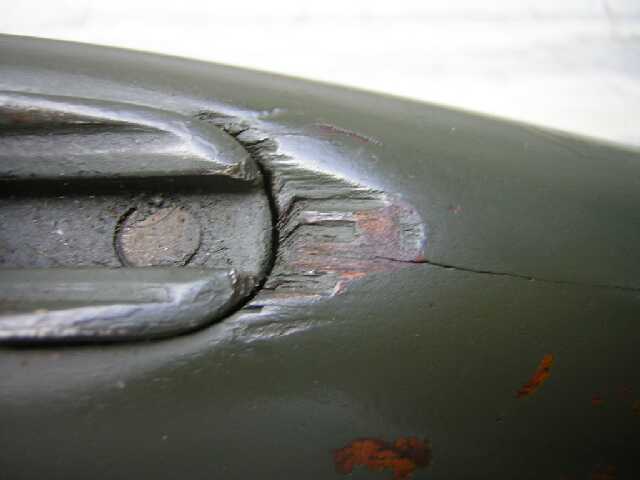
After installing the new scope, I'd shot the old rifle more than in all the years I'd owned it. From experience with my 38 Turk Mauser and its crack in the same spot, I knew exactly what caused this crack. The recoil lug on the action was not touching the recoil shelf on the wooden stock. The round rear tip on the tang was recoiling against
And so it began, more than two weeks of several hours work per day. I'm getting old and have been in bad health for years. My daughter, a crack shot, had started deer hunting. The thought struck me that this old and accurate, lightweight, low recoiling, but plenty powerful rifle would make her a fine deer rifle someday. So I went to work with "someday" on my mind.
For ease of work, I removed the trigger. And I discovered one reason for this old rifle's exceptional accuracy. At some point in the past, a very good welder installed a set screw in a metal tab and welded the tab to the original-I-guess military trigger, making an adjustable trigger. It looks like it was TIG welded onto the original trigger.
As I've owned the rifle since circa 1976, it was welded prior to then.
I used 3, epoxy-secured 3/32" brass pins made from one of the rods I sell here. Full installation instructions are on my 38 Turk page.
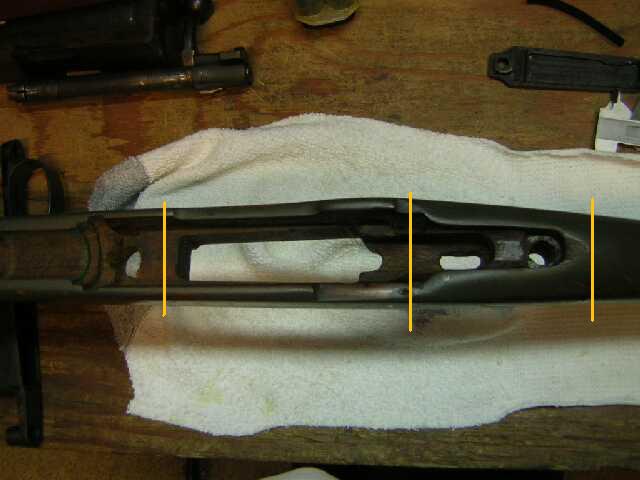
The brass colored lines drawn across the stock show the location of the 3 pins. From left to right, there's one across the recoil shelf, one across the center of the stock, and one across the split in the stock. I left room for a pillar in front of the recoil shelf pin.
This pillar is a section of a 1/4" x 20 NC carriage bolt. I drilled & dry-tapped the wooden stock for a perfect fit of pillar threads to stock threads. I filed down the pillar for a perfect fit of trigger guard assembly to action. Later when the epoxy dried in the threads, the fit became permanent.
Here's the same area after hours of filing & fitting and a J&B Weld bedding job. For better stick of the J&B Weld, I gouged out numerous cavities in the wooden recoil shelf. (I'm dangerous with a Dremel® tool.) The black spots on the J&B Weld are paint pulled from the bottom of the action. I can truthfully say this action fits this stock like a coat of paint. Note full bedding contact of the action recoil lug at its bottom, back and sides. Note how the round action screw housing is now a part of the action recoil lug, giving it more surface area and more strength. With a brass pin across it, a steel bolt through it, and a thick layer of J&B Weld around it and in it, this recoil shelf is forever.
Again, the stock was drilled & dry-tapped. Yes, I know I drilled the hole slightly off center. . . . Years ago I read or was told not to tap wood or it would ruin the tap. Truth or fiction, I don't know. But I do know (1) taps are cheap and stocks are expensive; and (2) epoxy between male and female threads makes a hell for stout junction. I could have installed a normal pillar for the rear action screw, i.e., with the screw through a metal tube. But the front screw would have required much work due to the bent front of the trigger guard assembly, which I was afraid to try and straighten. Having the two pillars between the two screws meant if I over tightened one without the other one snug, the not-snugged end of the assembly would rise.
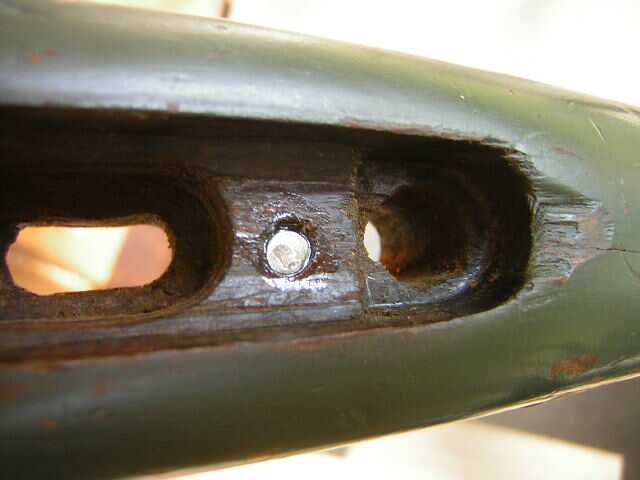
Trying to leave the surface of the (beautiful, huh?) stock untouched, I gouged much wood out of the stock directly behind and around the location of the rear of the action tang. There's 1/2" deep J&B filled holes under, beside and behind the tang bed job. I wanted that area as strong as possible in case of future recoil against the stock for some unforeseen reason. The big job—the bent trigger guard assembly and the cross threaded 1/4" bolt front action screw. Well, the barreled action, the stock, and the trigger guard assembly all fit together perfectly, steel action and steel trigger guard tight against a steel bolt at the front and a steel screw at the rear. It was time to do away with the cross threaded 1/4" bolt front action screw. I used a new Mauser 1/4" x 22 front screw from a Forster non-locking set # GD2MNL or Brownells # 319-414-098 @ $5.80 per set. It easily bottomed out in the recoil lug threads, so luckily the cross threaded #20 bolt hadn't hurt the #22 female threads. I spent several hours sittin' and thinkin' and measurin' before I decided on a plan of action. First, the countersunk hole in the M96 trigger guard assembly was too small in diameter for the head of the new Mauser screw. I chucked the screw in my drill press, then held a file against the spinning screw head until its diameter was small enough for a loose fit in the countersunk hole. The screw was still in a bind and would not enter the recoil lug threads without force. I took a rat-tail file and wallowed out the rear of the hole through the trigger guard assembly, making it oval shaped. An hour or so later, the screw slipped easily through the hole and into the threads. But the head of the screw caught on the rear of the countersunk hole.
In redneck speak, It ain't goin' nowheres.
On the right, see the troublesome screw. (I covered part of the trigger guard assembly serial number.)
The hard work on the rifle was over. Now, it was nitpicking time.
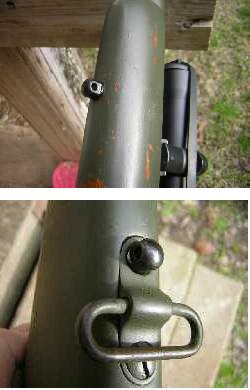
I liked the homemade sling attached to the rifle's original military sling hardware. But it was non-removable, and the front attachment was rusty. I figured when "someday" came my daughter would like a non-rusty store bought removable sling. In this non-clickable composite photo you see the changes I made. Both swivel studs are the wood screw swivel studs I sell here.
Removing the military rear sling attachment would leave a slot-shaped hole to fill, so I simply replaced its front screw with a swivel stud screw.
The firewood pile in the 2005 photo has long gone up in smoke, but here in 2010 we see the now 86 year old rifle against the backing barrel of my front yard shooting range. When my daughter saw her future rifle the first thing she said was, "What is that paint job?" "Olive drab spray paint," I answered. "For camouflage." "On the barrel, too?" "Well, yeah, all over except for the scope. It's starting to wear on the stock, but if I re-paint it, it'll just wear again." "Ohhh . . . kay. . . ." "I like it like it is," I said. "Gives it a junkyard look." "Ohhh . . . kay. . . ," she said again, contemplating. Then, finally, "I think I like it, too!" Shooting range results I had 8 rounds left over from hunting season 2009-2010. So I shot 2, 4 round groups. The first 4 shot group measured 1" and included the first round shot through the newly bedded rifle. It was a small flyer without which would have made a 3 shot group of 1/2". The word happy doesn't describe my elation.
"One of these days," I added, "you're gonna be around some armchair hunting experts who will laugh at your junkyard rifle. You look 'em right in the eye and say, 'Put your deer rifle's scope on its lowest power, and let's each shoot a group, rifle for rifle.'" "Okay!" she said. "Cool!"
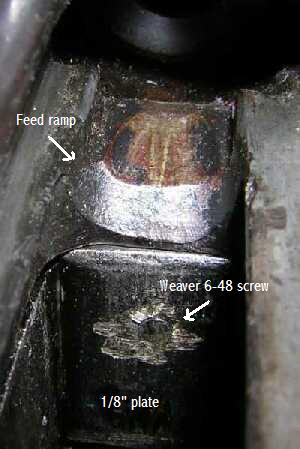
Here we go again!I thought I was through with the Someday rifle, but I forgot about its ejection problem. I assumed the problem was a worn ejector, but like everything else I had assumed about this old rifle, I was wrong.Trying to duplicate the ejection failure showed that a failed-to-eject case or round was always the next to last round in the magazine. And the last round in the magazine always had its tip hung up under the lip below the feed ramp. In other words, the mismatched, too long trigger guard assembly had struck again. There shouldn't have been a lip below the feed ramp.
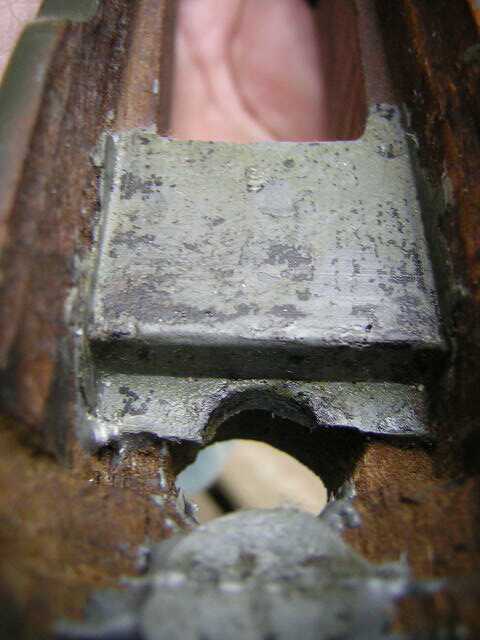
Jury-rigging time again!So I cut a piece of scrap 1/8" plate and attached it permanently to the inside of the magazine box. It took lots of Dremel® time to make it fit. I came in from the other side of the box, as you see it here, with a countersunk Weaver 6-48 x 3/16" scope screw. As the Weaver screw fit almost flush with the box, I didn't have to trim the stock. The shiny you see is where I ground the screw end smooth with the 1/8" plate.For insurance against separation of plate from box, I daubed a thin layer of J&B Weld between plate and box and also on the screw threads. The old action now feeds and ejects all 5 rounds as slickly as it did way back in 1924.
|
 This gif from my
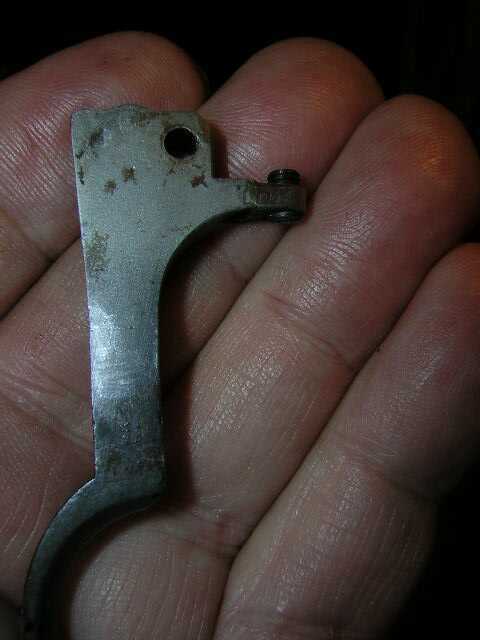

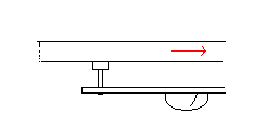
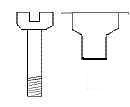 So I drilled the countersunk hole larger and reamed it rearward. Soon, the action screw fit perfectly. The bit left a "V" shaped bottom in the countersunk hole, so I chucked the screw in the drill press again and touched the screw head's spinning bottom edge against a file. This graphic shows it better than I can describe it. The fit of screw to hole is like that of a Weaver oval scope screw.

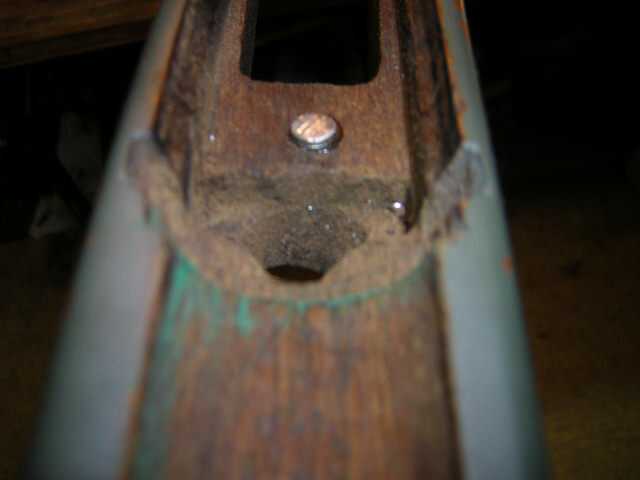
 The tips of all rounds in the magazine should slide smoothly up the front of the magazine box and slip just as smoothly onto the feed ramp and into the chamber. But the edge of the magazine box extended about 1/8" past the edge of the feed ramp. In other words, the magazine box was about 1/8" too long for the opening in the action—this due to the trigger guard assembly being about 1/8" too long for the action.