Click here for article #1.
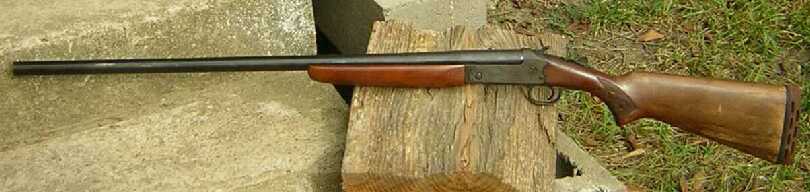
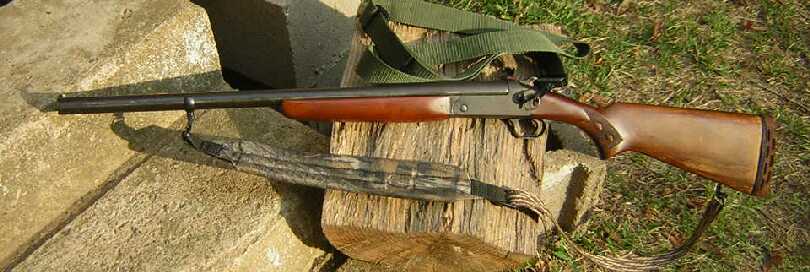
| That's "Before" at top and "After" below it. Having found the Stevens 94 shotgun shown above, I had heck deciding what to do with it. Then I thought about the privet hedge thicket along the creek about 200 yards behind my house. Come January when all the acorns in the woods around the thicket are eaten and gone and the browse is dead and gone, the privet hedge is still green. The thicket is as full of deer then as a corn crib is full of mice. Do an autopsy on a January deer killed in the woods behind my house, and its paunch is full of a green mush—chewed privet hedge leaves. The problem with ground hunting in that thicket is nearby houses. Five houses sit on a ridge 30+ feet higher in elevation than the thicket and through the woods from 200 to 350 yards away from the thicket, mine being the closest. Although a rifle bullet would have almost no chance of (1) rising 30 feet and (2) making it through a thicket and at least 200 yards of woods, only a fool would ground hunt there with a rifle—almost no chance are the key words! Thus the idea of a thicket shotgun loaded with a slug or buckshot. I could get inside the thicket with the deer. Maximum range = 30 yards, maybe. Probable range = 10 to 20 yards. Time to get out the hacksaw! Note: "After" weight = 5 lbs 13.6 oz = kicked like a mule on steroids = factory Super X 000 buck recoil energy = 2x the recoil of a 10 lb 300 mag rifle. One round of factory 000 buckshot fired from the bench knocked me off my stool and sent the shotgun flying through the air. All it hurt was my shoulder, my arse and my pride. Thank God my brothers weren't watching! Thus an added 11.4 oz lead shot in the shotgun's butt = 6 lbs 9 oz total weight now.
The dim black marker smear above the two dimples is the circa 24" mark for the hacksaw. The circa 24" mark was arbitrary. If I messed up drilling & tapping the little hole for the new front sight, or put the hole in the wrong location, I could whack off another 1/2" of barrel and start over. The stretched thread indicates the center line of the barrel. The upper end is across the factory bead front sight, and the lower end is centered in etched lines put above the chamber centerline at the factory. As the shotgun shot one duck to the left due to a slightly bent barrel, I decided to compensate for the bend via installing a new front sight slightly off-center to the left. That required punching a start hole for the drill bit. After deciding the bottom, punch-made dimple was too far to the left, I re-stretched the thread and punched another dimple.
Here's the hacksaw in action. → → → →
I've hacksawed off several barrels, but this shotgun barrel was the easiest of them all.
With a carpenter square as a guide, I squared the end of the barrel with my bench grinder, then fine tuned the right angle with a file.
Then a few seconds with a Dremel® grinding stone on the outside and inside of the new muzzle, as you see here, and it was ready for a bluing touch-up pen.
That little sucker is bright! It came with 5 tiny threaded studs to fit any shotgun barrel with a threaded hole. It was easy to install. I put medium strength thread locker on the screw threads and on the same nylon sewing thread I'd used previously. To make the sight stop in the proper position, I simply added and removed turns of sewing thread as needed. NOTE #1: The little screw can touch the fiber optic rod and break the rod if you're not carefull. NOTE #2: I drilled the #45 hole too close to the end of the barrel. It's at 3/16" and should be ~5/16" from the end of the barrel. While resting the muzzle on a board so I could fill the bolt hole through the stock with lead shot—Recoil with a capital R— I broke the front off the sight. It still works but it's not as bright, so I'll change it before deer season gets here.
NOTE #3: This HI VIZ BD1007-G Spark II Sight gets 5 stars from me for price, function and ease of installation.
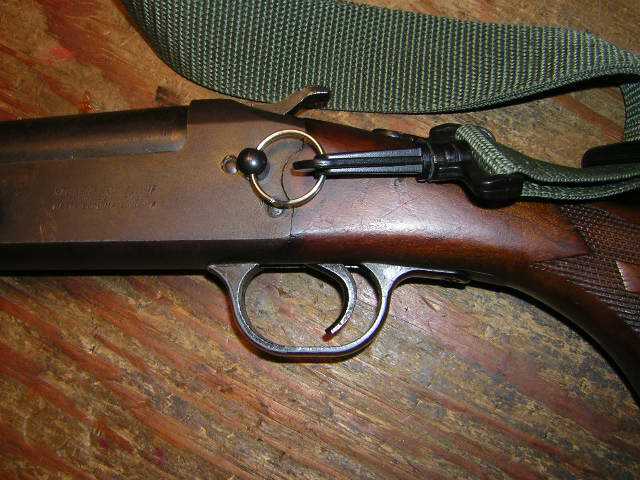
Here's the saddle ring after installation and with one of the $22 saddle ring slings I sell here. The ring itself is one of the 80˘ stainless steel split key chain rings I sell here. The saddle ring stud is one of the $2.25, 10-32, 3/8" machine screw swivel studs I sell here.
All I wanted was about 5 threads purchase, which, as the old rule says, are threads at least equal to the screw diameter. On the right is a new 3/8" machine screw swivel stud shown for information purposes. In the center is a partially installed and cut-off 3/8" machine screw swivel stud. On the left is the cut-off portion of the partially installed stud. I used an electrician's wire stripping tool and cut the stud to a desired length of about 5 threads showing. I said "partially installed stud." Note some things about the picture. First, the stud needs to make 1/4 turn to the right so a saddle ring flops back and forth horizontal to the barrel, not up and down and horizontal to the trigger. Second, notice how the stud sits slightly above the surface of the receiver. That's due to the threads of the stud not going all the way to the head of the stud as you can plainly see in the new stud shown. I solved the flopping-wrong-direction problem via chamfering the inside edge of the 10-32 hole. Believe it or not, I used a $2.98 Lee Chamfer Tool # 90109. Like deburring the inside of a case neck, I put the tip of the little tool in the 10-32 hole and gave it a twist. Via twist and try, the stud slowly turned further in and was soon perfectly aligned. It took longer for me to write it than it did to do it.
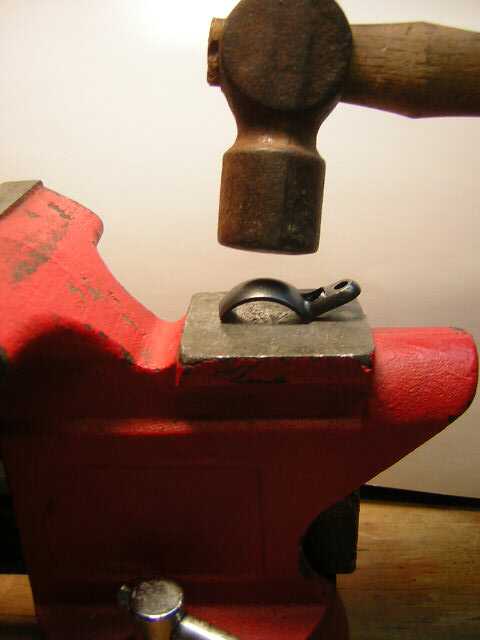
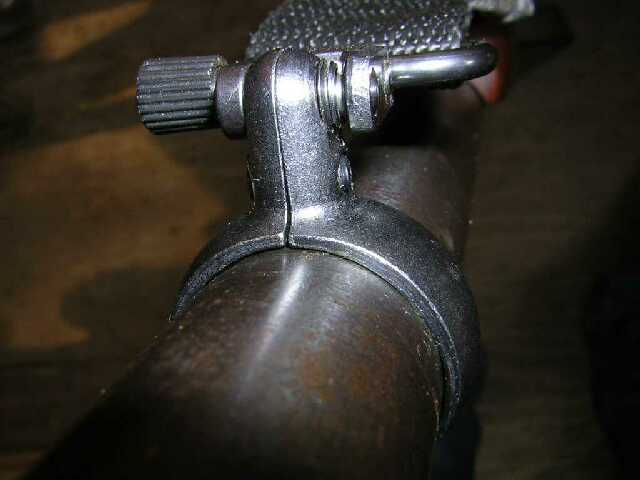
Next came installation of swivel studs for a regular sling. I used Uncle Mike's largest barrel band set for .850" - .900" barrels. It was Uncle Mike's # 15912 Model #2 and Brownells # 593-159-001. Cost = ~$22.00 including a wood screw sling stud for the stock and loops for the sling. But at the desired barrel band installation point above the forearm, my barrel OD measured a slightly oval .908" to .923". Maybe that was due to the bend??? Whatever the case, I had to "adjust" the diameter of the barrel band. The photo shows how I increased the diameter of the barrel band. It was tap & try, tap & try, repeat, repeat on both band halves. Finally, the assembled bands were a near-perfect fit around the barrel.
I gouged glue-purchase lines in the inner surfaces of both bands, then de-oiled the barrel and both of the bands with alcohol. My glue was medium strength thread locker.
Had I taken a "Before" version of this photo, it would have shown a gap between the barrel and the bands large enough to insert a screwdriver blade between them.
The red fiber optic rod is epoxied in place. (That's the stainless steel saddle ring you see on the right of the photo.) The only preparation was de-oiling the U notch with alcohol and carefully stuffing a daub of grease in the firing pin retainer screw hole, which is under the red rod. If at some future time I need to remove the little 6-40 retainer screw, I'll simply knock off the piece of red fiber optic rod. At $2.50 for 10" that's 8˘ you're looking at. To aim and fire, for example at the targets shown below, I just slid the green front dot down in front of the red rear dot and pulled the trigger. Actually, I'm not sure two rear red dots would be easier to use.
Casting, Loading & Testing
Then I sprayed the undersides of the sprue plates with spray graphite lube available cheap at both Ace Hardware and NAPA.
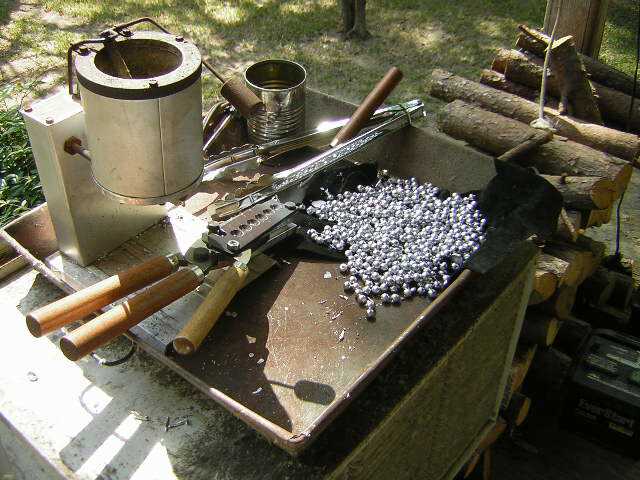
With the 18-hole 000 buckshot mold you see here, it took exactly 22 minutes to empty the 10-lb pot. Forum posts about the Lee 000 buckshot mold had a common complaint: it took too long to get the mold to operating temperature. The cavities/holes near the hinge didn't fill out properly, they said. My thoughts were So what? I heated the mold on top of the pot and started casting buckshot, paying no attention to their quality as I dumped them on my leather pad. I filled and dumped, filled and dumped, etc., until the pot was empty. About 90 to 95 % of the resulting buckshot looked fine to me. I probably have a lifetime supply of 000 buckshot from 22 minutes work.
Here's some randomly selected Lee 1 oz slugs and 000 buckshot in a peanut butter jar lid. The slugs are as near to perfection as any bullet I ever cast. You can plainly see the "drive key" about which Lee brags. Well, it ain't bragging if it's true. Lee has a winner in their slug molds. Surprisingly, at least to me, the slugs were tapered. Their OD was .686" at the top and .673" at the base. I now suspect they were designed to fit the inside taper of red plastic WAA12R wads. More later on that. The 000 buckshot are fine, too, except for the little sprues which connected them inside the mold. If a fellow filed them off he'd have a near perfect .360" round ball. I shot them as cast, and I don't believe it mattered. I tried cutting off the sprues with a knife blade and found it too much trouble for the gain in accuracy . . . if any. As a future rainy day project I will lube and run some of those .360" balls through my Lee .358" push-through sizing die and load them in my 357 mag minimax T-C Contender pistol. At an average weight of 69.2 grs and at 1300 fps or so, they'd make a dandy finishing-off round or squirrel round. Stay tuned!
Opening A Shotshell Loading Can Of WormsSeveral years ago I bought a Lee Whackit 12 ga shotshell loader from a forum member. I'd never used it. When I started thinking about this thicket shotgun project I figured, correctly as it turned out, that the Whackit Loader would be fine for loading the few slug and buckshot rounds I would shoot at deer. For example, I still had on hand a 5-pac of Super X 000 buckshot rounds I bought in circa 1977. I don't do much buckshot shooting, needless to say.At the beginning of this thicket shotgun project, I bought a 15-pac of Super X 00 buckshot. So I had the 5-pac of factory 000 and the 15-pac of factory 00 to hunt with in case I couldn't get the homemade Lee 000 and slug rounds to shoot to my expectations. As Robert Burns wrote, The best laid schemes o' Mice an' Men...
In short, if your powder Y has a VMD of .xxx and the listed load weight of x grains gives you a volume of 3.3 cc, it will occupy more hull space than my 3.1 cc load. You won't be able to crimp the hull. VMD x Weight = Volume. So 28 grs of a powder with a VMD of .095 occupy 2.66 cc. That's 28 x .095 = 2.66. To get 3.0 cc of that powder, you'd need 31.5 grs of it. That's 3.0 ÷ .095 = 31.578. From high school algebra: if X x Y = Z then Z ÷ X = Y and Z ÷ Y = X. Is that clear as mud? Just look at it as a way to see if your powder with my components will give you a good crimp. If your powder occupies 2.8 cc and mine occupies 3.0 cc, then your payload column is too short to crimp. If your powder occupies 3.2 cc and mine occupies 3.0 cc, then your payload column is too tall to crimp.
Algebra class is over, so let's load and shoot slugs & buckshot!The components I had on hand:
 The Lee Whackit Loader worked like a charm. It was perfect for loading one round at a time for target use. When the loading ended I had only a small box to put under my loading bench instead of a bulky loading machine bolted to the bench. If you load just a few slug or buckshot rounds a year, find a Lee Loader on eBay and buy it. Use goggles when loading with it!
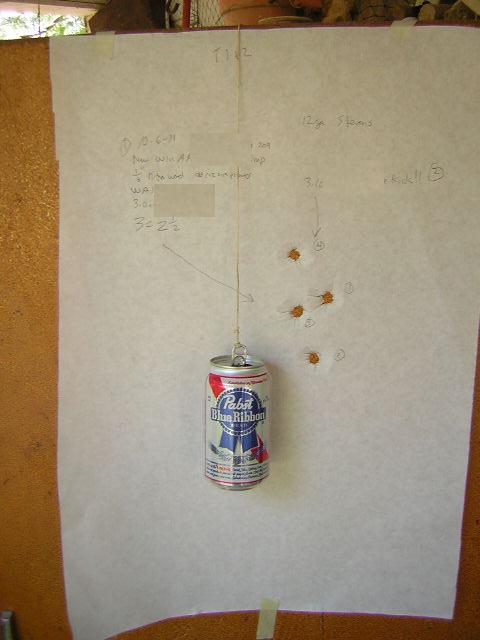
 Wear gloves when seating primers. A shotgun primer has more blast than a rifle or pistol primer. Over the years of my reloading regular cartridge rounds on Lee Whackit Loaders, I've set off several rifle and pistol primers. So wear goggles to protect your eyes and wear heavy gloves to deflect the blast as you see me doing here. I did all the shooting off my front porch. I taped ~16" wide by exactly 24" tall sections of butcher paper to a big cardboard box and put the box out in my front yard. Note: I put no bullseyes on the ~16" x 24" backing paper. I guesstimated the center of the paper and pulled the trigger.
Sad to say, the Lee 000 homemade loads shot noticeably worse than the factory 00 loads. The factory 00 rounds were buffered and had no plastic shot cups/wads. I shot the 000 loads without plastic shot cups/wads and with plastic shot cups/wads. Most were worse than what you see here, so I'm guessing the 000 loads didn't like my choke-less Cylinder bore. They all shot so poorly I moved the cardboard box to 20 yards, but the 000 rounds still had many off-target flyers! On average, I'd say 1/4 of all the 000 buckshot pellets were off-target flyers—on a target larger than a 5-gallon bucket sitting at 20 yards! Over several days of loading and frustrating shooting I wasted many years of my "lifetime supply" of Lee 000 buckshot pellets. The biggest problem was trying to stuff .360" balls inside a plastic shotcup/wad.
The RP12 wad on the right contains 5 Lee 000 buckshot. There's no way to get a good crimp on a shot column like that one. Shot buffer like in the factory rounds might have worked, but might is the key word. But I was not sending www.ballisticproducts.com any more of my money. I'd use the factory 00 loads. If a reader's shotgun has a choke, the 000 buckshot might work using buffer and no plastic shot cup.
Success with the Lee 1 oz slugAlthough no loads worked to my satisfaction with the Lee 000 buckshot, all loads worked well with the Lee 1 oz slug!
The bottom 3 shots were with 3.0 cc powder X and the top shot was with 3.1 cc powder X. It kicked more, shot a little higher, and the shot column was a tad too tall for a perfect crimp, so the load is with 3.0 cc powder X.
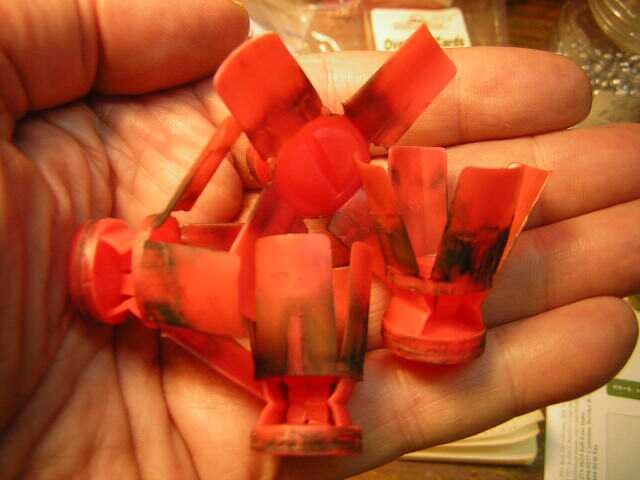
Here's the 4 WAA12R wads from the 4 shots above. Notice the perfect, tight fit of slug to wad, wad to bore and the obviously smooth and slightly compressed path of the wad and its slug payload up the barrel. With such a perfect fit and such great results, I'm not sure a rifled slug barrel would shoot this well. Maybe as well, but not any better!
Here's a look inside one of the above wads at the after-ignition fit of WAA12R wad to Lee slug "drive key" and slug bottom edge. The bottom of the slug is actually a press fit into the WAA12R wad. Without downward pressure it sits maybe .020" above the wad. I thought about putting a thin wad of some sort between slug and wad, but why mess with perfection? If it works, leave it be. That's just what I plan to do….
Not bad for a Whackit loader, huh? This Win AAHS hull has probably been shot 6 or 8 times. As glue and epoxy won't stick to an HDPE plastic hull, come hunting season I'll waterproof my slug loads with beeswax in the crimp and fingernail polish around the primer. All I have to do now is wait until January…..
Update: November 1, 2011 Here's a downstream look at the creek early on the morning of October 29, 2011. Note the big difference in the foliage on the left, east side of the creek and on the right, west side of the creek. Note the slanting beams of the rising sun.
 The west side of the creek gets several more hours per day of direct sunlight than does the east side—thus the profusion of vegetation on the west side. In the dead of winter a deer inside that west-side evergreen thicket could simply stick out its neck for browse and walk a few yards for fresh water. How's the creek situation on your hunting land? Are you spending hours in a box stand overlooking shooting lanes while the deer are cozy in a nearby thicket?
|


 They would fit side-by-side in a wad-less 12 ga hull and stack neatly for a decent crimp. Not so in a 12 ga wad as you see in this RP12 wad on the right. The WWAA12R wads stacked just as ugly.