Copyright 2009 by Junior Doughty
|
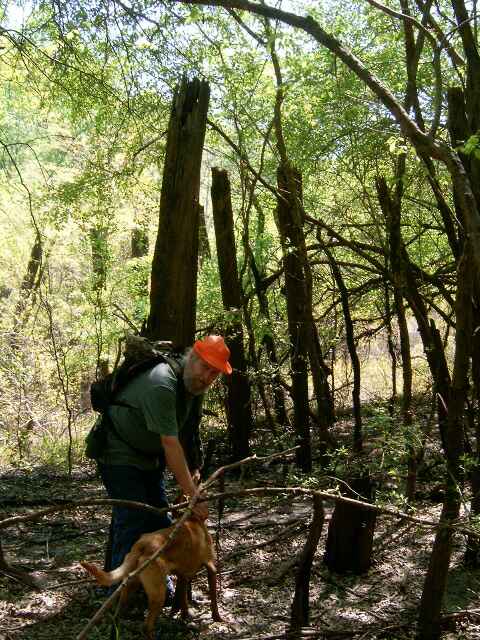
On the back side of the deep woods where I deer hunt there's a 120 acre thicket a man can't walk through. They clearcut it years ago, but they left the cull oaks standing. Now those mostly hollow oaks are forest giants, larger in diameter than the average dining table and with gnarly limbs the size of logs. There's one every 75 yards or so scattered across the acreage and surrounded by an impenetrable morass of thorn bushes and briar vines. But directly beneath the oaks, the ground is clear of underbrush. That fact sounds strange unless you understand the Darwinian mechanism at work. Oak trees possess an unusual survival mechanism—the leaves and bark contain tannic acid. Due to the acidic soil, almost no brush or grass grows beneath an oak, especially an ancient oak. The oak alone gets the moisture and nutrients from a circle around it the size of its canopy.
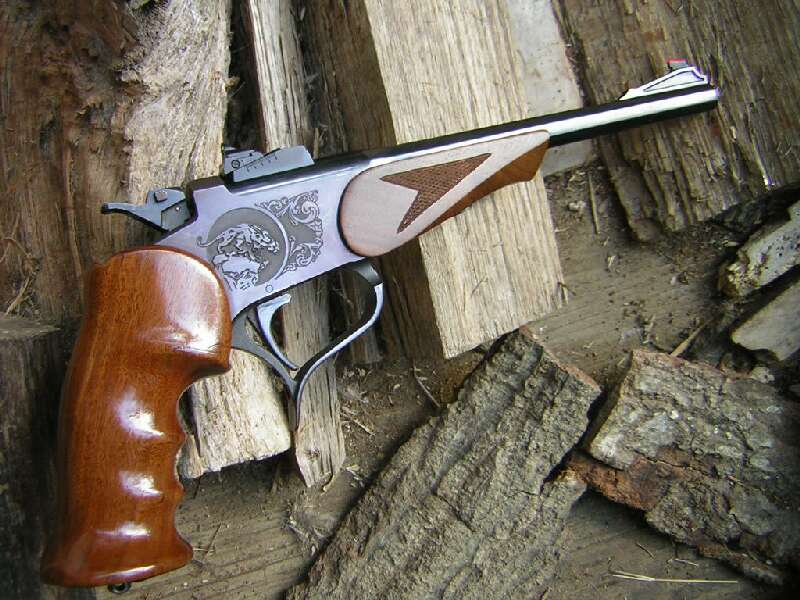
I'm a free bleeder because of heart medication, and I was worried about the blood oozing down my hands and arms from several little scratches and tiny stab wounds. I should have turned around when the walking became difficult, but noooooooo, I kept going! On another trip through the deep woods I scratched my hand on a blackberry briar and almost bled to death. Since then, my backpack has contained a first aid kit with a bottle of coagulant powder. So I rested against the oak, lowering my heart rate, and I daubed the little wounds with tissue. The bleeding finally stopped without me having to use the coagulant powder. I'm sure I breathed a sigh of relief, and I probably made a vow to stay out of thickets. I rested and snacked and refreshed myself with water from my canteen. Then I noticed something unusual about the thicket around me, something which had been invisible while I was standing. From my low position, I could see tunnels leading through the thicket and extending out from the oak like spokes of a wagon wheel. Some of the tunnels headed in the direction of other giant oaks. Around me beneath my oak I could see deer tracks, and I could see deer tracks on the floor of the nearest tunnel. Realization came—either purposely or by accident, the deer had made themselves a road system from giant oak to giant oak. It probably extended all over the 120 acre thicket. Finally rested and refreshed, I looked around and saw a tunnel headed in the direction from which I came. I got on my hands and knees and, dragging my rifle, crawled along the tunnel until I reached an area where the thicket wasn't so thick. From that day, I often thought about crawling back down the same tunnel and sitting beneath the same oak and watching down the tunnels. I'd need a firearm other than a rifle. I'd have to drag a rifle or strap it across my back where it would snag again and again. I needed a pistol I could strap across my belly while I crawled on hands and knees. Then came another realization—ol' Mossy Horns probably hung out in that thicket during daylight hours. My thoughts turned to a proper thicket pistol. My Ruger Super Blackhawk was too heavy, and if I placed it across my belly in a position where I could grab it fast, when I got on hands and knees and started crawling it turned and fell and hit the floor. Besides, a thicket pistol should have no sparkly shine, and I couldn't see taking sandpaper to the Ruger. My T-C Contender might work, I thought, but not with the big ol' Super 14 barrel which came on it. I needed a lightweight 10" octagon barrel in 357 mag or 44 mag.
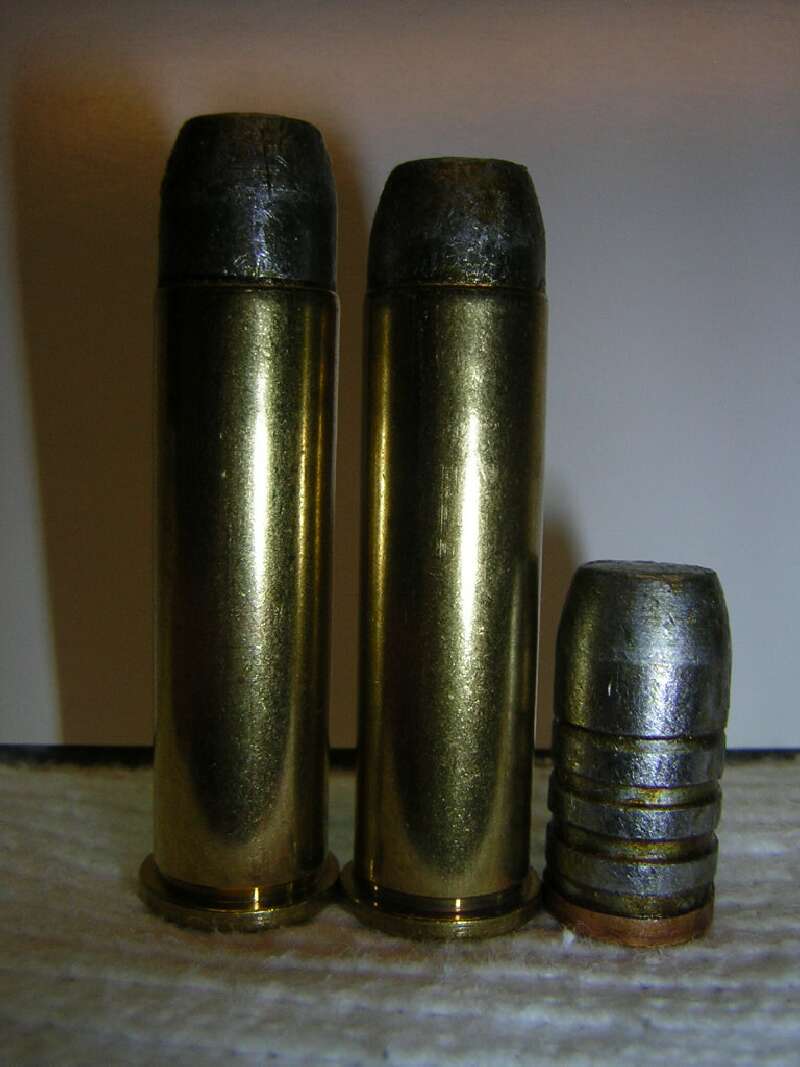
In 357 mag, I could use a Lee C358-180-RF bullet from a mold I got in a group buy on the Castboolits forum. Ready To Load, it weighed 190 grs and I could push it to 1750 fps in my Rossi carbine with its 20" barrel. I thought 1600 fps was possible in a 10" Contender barrel. In 44 mag, I could use a Lee C430-310-RF bullet RTL at 314 grs. Around 1,100 fps would be easy to obtain in a 10" Contender barrel.
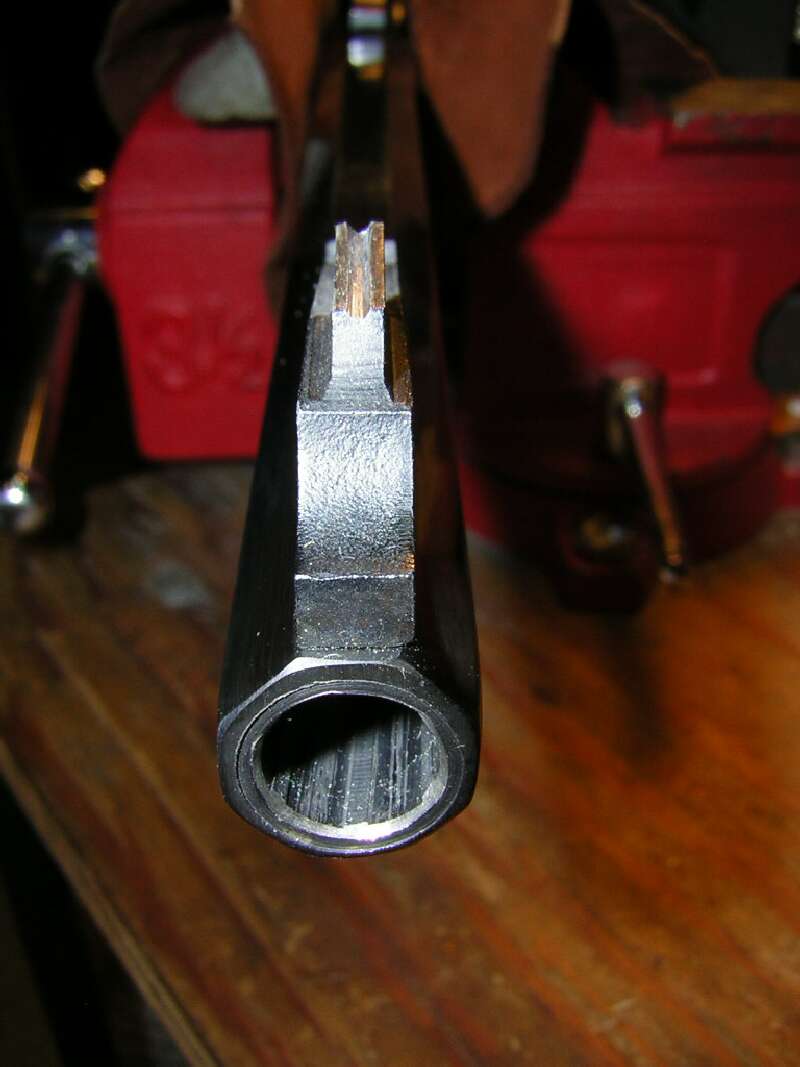
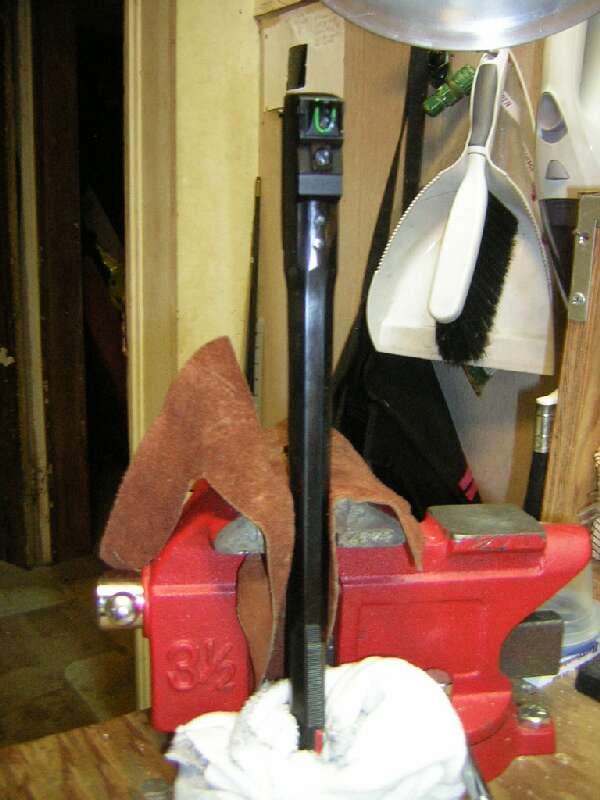
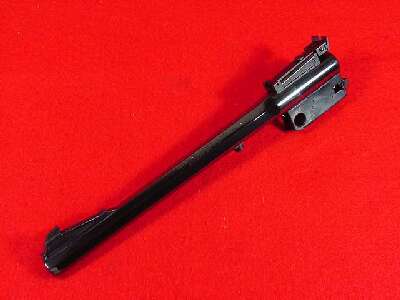
A fellow with the User ID of "CJStoilis" posted an octagon 10" 357 mag barrel and I bought it. With shipping, it cost me $181.50 and it looked better than "CJStoilis" described it. The bright and shiny finish had to go. That's it on the right in the original gunbroker.com photo—used with permission and reduced in size. I installed the barrel in my Contender action and stuck it gangbanger style behind an Uncle Mike's pistol belt I've had for years but wouldn't use because of its stiffness. It worked like a charm. I could jump up and down and run around the yard and even crawl on hands and knees and the pistol stayed put. The front sight ramp caught perfectly on the bottom edge of the stiff gunbelt and held the pistol in place. The barrel with its T-C rear sight and installed in my Contender action gave a total pistol weight of 2 lbs 8.8 ozs. That was about a lb less than my Ruger SBH. Packing this thicket pistol would be easy, I knew. But I began to wonder about the recoil. . . .
Time to change the sights!First, I removed the T-C rear sight. Then I scrubbed the barrel's shiny finish away with a Scotchgard� pad. Then, mainly as a rust preventative, I gave the barrel a coat of Brownells OXPHO-BLUE® cold blue. The result was a not-quite-matte but not-quite-shiny finish. It looked just fine to me.
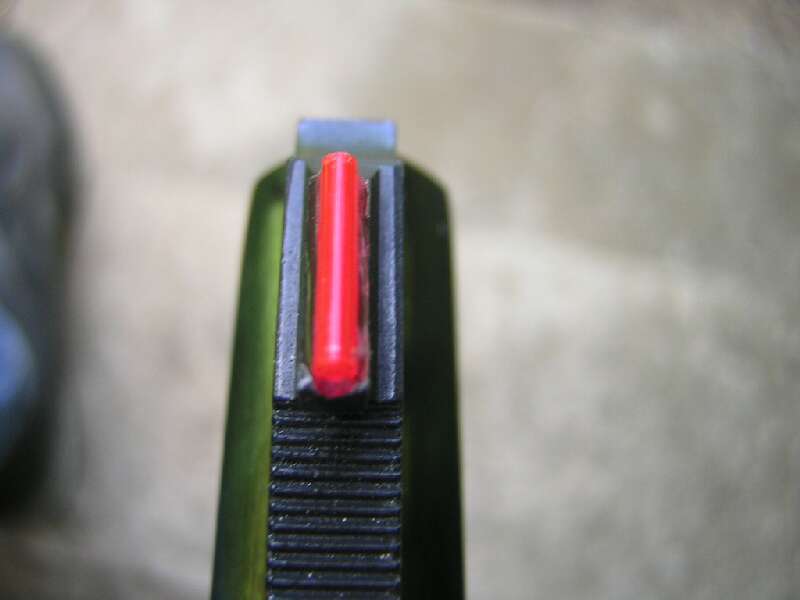
At $2 for a 9" rod, the 3/8" front sight cost me about 8� plus maybe 2� for epoxy. We'll call it 10� total. As the photo shows, I took a triangular file and filed a slot along the top of the front sight blade. Then I used a toothpick and smeared a tiny daub of epoxy along the slot. Did I mention tiny daub? Hint: if you smear a tiny daub of epoxy along the slot and think maybe you should add more, stop! You probably have the perfect amount of epoxy in the slot. If you'll notice, especially in the full size photo, the depth of the slot is less than half the diameter of a rod.
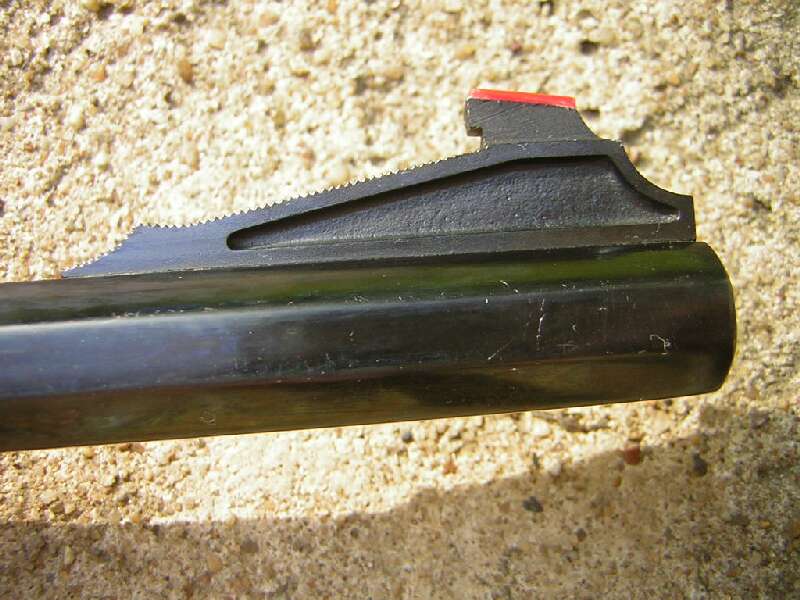
On the right, see the finished front sight—the camera now to the rear of the sight. In the full size photo you can see how that tiny daub of epoxy has oozed upwards and encased the sides of the red fiber optic rod. That little rod ain't goin' nowhere! It's still in place after a bunch of heavy recoiling rounds and several wrist bustin' rounds. (More later on that.) If your epoxy doesn't ooze upwards enough, use a clean toothpick tip and give it a gentle nudge upwards. Did I say gentle nudge? The photo below is a look at the new front sight from the side. It's also a look at my not-so-matte but not-so-shiny finish job. The green is a reflection of the grass in my front yard—I guess. What I know is, The barrel doesn't have a green tint.
I worried if this T-C front sight would have enough height for the Williams rear sight. The barrel is too thin for drilling & tapping to install a new ramp, so it would mean soldering on a new and higher ramp, which I didn't want to do because:
 I don't understand why T-C doesn't make front sights for octagon barrels with replaceable blades in different heights. Turned out that the front blade with its added red fiber optic rod was tall enough—just barely!!
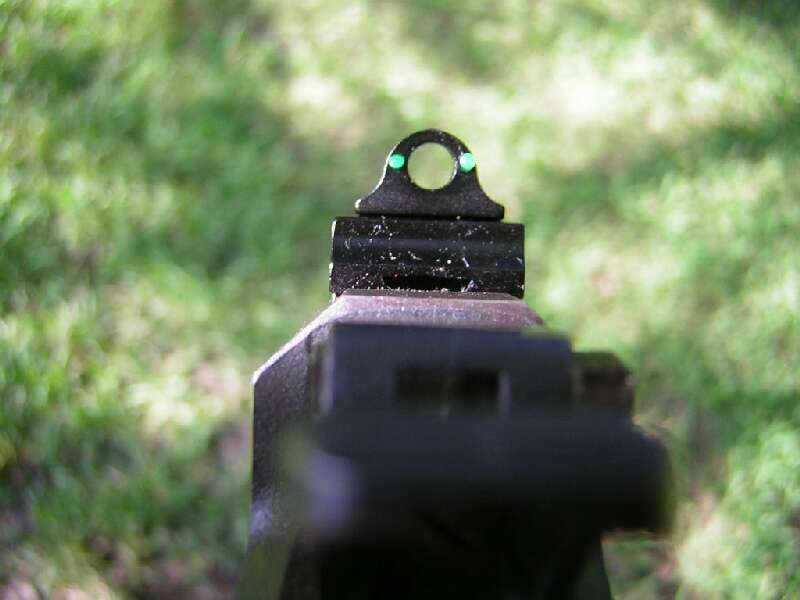
The Williams rear sight and the ghost ring slide installed easily. As this photo shows, there's not much downward elevation adjustment left on the sight. One more click down, maybe.
The observant reader will see the left green dot as a smidgen smaller than the right green dot. The little "U" shaped green fiber optic rod either came cracked or recoil cracked it. Williams sent me a no charge replacement, but I epoxied the broken rod back together. If it breaks again, I'll install the replacement rod. In action,
Speaking of action.....I started running 190 gr bullets over my Chrony. My Rossi 20" carbine's 1750 fps loads clocked 1572 fps in the Contender 10" 357 magnum barrel, less than I had expected. Recoil, however, was greater than I had expected.Damn the recoil, I wanted more velocity. I could gain velocity by seating the bullet out a little, increasing the case capacity and allowing for slightly more powder. I had to load the 190 gr bullet to a COAL of 1.550" and crimp it out on the ogive or it wouldn't feed in my Rossi. With just a slight increase in the 1.550" COAL, the bullet still had to be crimped on the ogive or it jammed against the lands of the Contender 357 magnum barrel. Thus came the 357 mini-max idea.
I borrowed a Manson 357 maximum finishing reamer. I decided to ream the chamber out not to full 357 maximum length but to whatever lesser length would allow seating of the 190 gr bullet in its crimping groove. That would also give me a slight increase in powder capacity and consequently more velocity. So I began. I had never held a chamber reamer in my hands, much less reamed a chamber. The nagging suspicion came over me that I was about to ruin my $181.50 Contender barrel. I shouldn't have worried—the Manson reamer looked more like a work of art than a tool, and it worked flawlessly.
I seated a test bullet in a case and stopped seating when the case rim barely touched the bottom of the bullet's crimping grove. That would give me .020" or so clearance to the lands.
In its final 357 mini-max form, the pistol weighed exactly 2 lbs 7.8 ozs or exactly 1 oz less with the aluminum Williams rear sight than with the iron T-C rear sight. Plus it lost a little weight from the reaming. The recoil force of this 2 1/2 lb pistol is ~19 ft/lbs compared to an 8 lb 30-06 at ~13 ft/lbs. Brutal is a good word to describe this pistol's recoil with a full power heavy bullet load.
New chamber depth = 1.320" and was measured from the rear of the barrel to the new inside chamber lip. I forgot to measure the old chamber depth, but a guess is around 1.300". Obviously, with a chamber depth increase of only ~ .020" and a COAL increase of .065", the reamer took metal off the lands, probably giving them a slight taper which fits the bullet's ogive and allows it to seat out .045" more. And hopefully increases the accuracy potential of a cast bullet. The new useable case capacity = an increase of about .11 cc or 1.5 to 2.0 grs of powder.
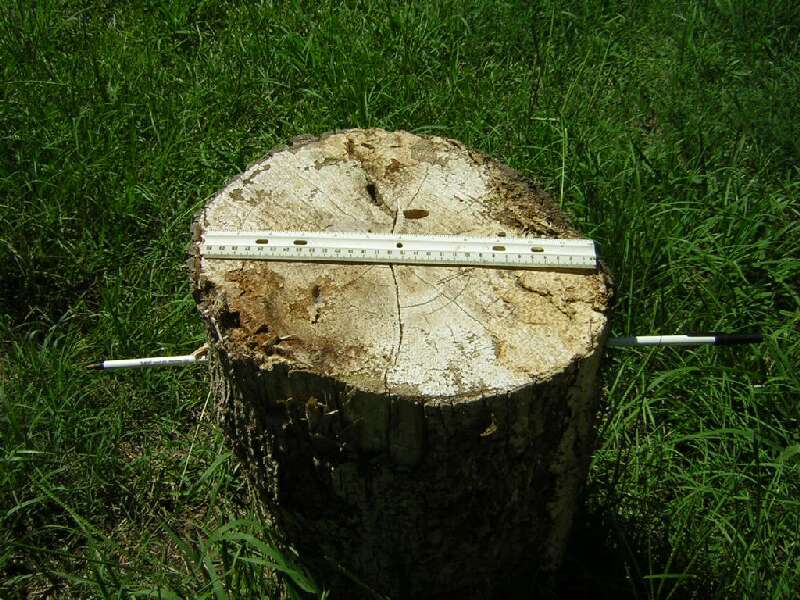
While we're talking about powder. . . . I won't name the one I used in the heavy loads as they are above manual maximum loads for 357 magnum. But even the heaviest load I used—which gave 1734 fps—produced no pressure signs. Even the primer edges remained rounded.I installed my Chrony in my front yard maybe 10 feet from my front porch. Then I stood on my porch to shoot at a downward angle across the Chrony. The bullets safely impacted the ground in my front yard. To my surprise, I suddenly noticed that the wide meplat bullets hit the ground with what can only be described as an explosion. Chunks of dirt flew higher than the roof of my house. About the time I noticed the flying chunks of dirt, I noticed the hole in my front yard. Junior, I says to myself, you're gonna have to fill up that dang hole.I had one round left to shoot, so I walked over to my woodpile and a bunch of log sections waiting for me to get enough ambition to split them. I rolled a log section behind the Chrony and in front of the hole in the ground, which I didn't want any deeper. Back at the business end of the Chrony, I could see that the fired bullet would pass over the screens and hit the log section. I fired the round. The Chrony read exactly 1650 fps.
Here's the log with a 12" ruler for scale across the top. The log is 13 1/2" thick at the point of penetration. I slid ballpoint pens in the holes for visual effect. Over the next few days several more 1650 fps to 1734 fps rounds went across the Chrony and all of them penetrated the log. It wasn't oak, but it also wasn't soft pine, and it wasn't rotten. I have no fear of penetration on ol' Mossy Horns even if he's facing me. The bullet will go in one end and out the other end, especially at almost point blank range.
Powder = WC820 (n) Bullet = 180 gr Laser-Cast "L 38 CAL 180g FP .358" This same bullet from my 1 in 32" twist Rossi hit the target sideways. From the looks of these perfectly round holes, the Contender's 1 in 14" twist stabilizes it perfectly. The bullseye = 5 1/2" and the 4 shot group = ~4 1/2" which is fine for 45 yards off the side of a tree. The velocity for this 180 gr Laser-Cast bullet = 1452 fps. The bullets are cheap—$68.00 shipping included for 500 rounds—so this will be my beer can, boar hog, and bad guy load. Notice the painted-over masking tape between the 9 and 10 on the left side of the bullseye. That was the last round fired with the 190 gr C358-180-RF and unnamed powder. The velocity for that particular round was 1720 fps. I'll drop that charge a little for a circa 1700 fps deer hunting load come hunting season. The 180 gr 1452 fps Laser-cast load shot to the same Point Of Impact, so come hunting season all I'll have to do is load some 190 gr 1700 fps rounds and go crawling down a tunnel in a thicket.
The little belt pouch holds 12 rounds. My finger points to another round which happens to fit a loop in the homemade chest strap of my hunting backpack. I can grab that round and reload the thicket pistol in about five seconds flat. One final note: Some guys ream 357 magnum Contender barrels all the way to 357 maximum length. They can then shoot a 190 gr bullet to circa 1900 fps. In my 2 1/2 lb pistol, a 190 gr bullet at 1700 fps is all the recoil my wrist can stand. Just because you can do something doesn't mean you should do something. Update! Check out the buried treasure I found in the hole in my front yard!
|
 Plan in action, I started hanging out on